
Find Your Location
Adding your location to your Instagram bio is a great way to show your followers where you are. It can also help you gain local followers and promote your business or services in your area. In simple steps, this tutorial will show you how to find and add your location to your bio.

Use Google Maps to find your exact location
The easiest way to find your location on Google Maps is to type in the name of the city or town where you live. For example, if you live in Texas, search for “Dallas, TX.”
Once you enter the city name in the search bar, you will be presented with a map of your area with markers indicating places of interest and major landmarks. You can zoom out further to get a more detailed map and zoom in for a more precise view.
Once you find your desired location, click on it, and Google Maps will display its exact coordinates. You can copy and paste these coordinates into Instagram for use in your bio.
This can be very useful when other users want to join you at an event or visit where you’re based. By including this information in your bio, other users will better understand where you are located geographically.
Copy the URL of the location page
Once you’ve found the location you’d like to use in your bio, you can copy the page URL. To do this, click on the blue checkmark next to your selected location, and a window will appear with details about it.
Copy the URL at the top of this page and paste it into your Instagram bio. The link will redirect people to the special page you’ve created for your Instagram followers.
You can also add a map of your current location or where you plan to be in real-time, easily and quickly, by copying a link from Google Maps.
To do this, open Google Maps, search for directions from point A to point B, select “Share Directions,” and copy the “Send Via Link” text straight into your bio. This feature allows users to see exactly where you are located in an informative manner.
You can also use platforms such as Foursquare or Yelp to get a link for places such as restaurants or specialty stores that is much more informative than a simple map image.
Whenever someone clicks on it, they will be directed to an interactive page containing detailed information about what type of business or facility it is – including photos, reviews, and more!
Add Location to Instagram Bio
Adding location to your Instagram bio can help give your profile a more personalized feel. It also helps inform viewers where you are from or where you currently live, which can be great for those looking to connect with people in similar areas. Here are some simple steps to add a location to your Instagram bio so you can get started.
Log in to your Instagram account
Before adding your location to your Instagram bio, you must log in to your account. To do this, open the Instagram app on your mobile device or visit instagram.com on your computer and enter the required login credentials.
Once you have logged in successfully, navigate to the account Settings page by tapping or clicking the gear icon beside your profile name at the top of the screen. From here, you can edit your bio and add a location.
Go to your profile page and click “Edit Profile”
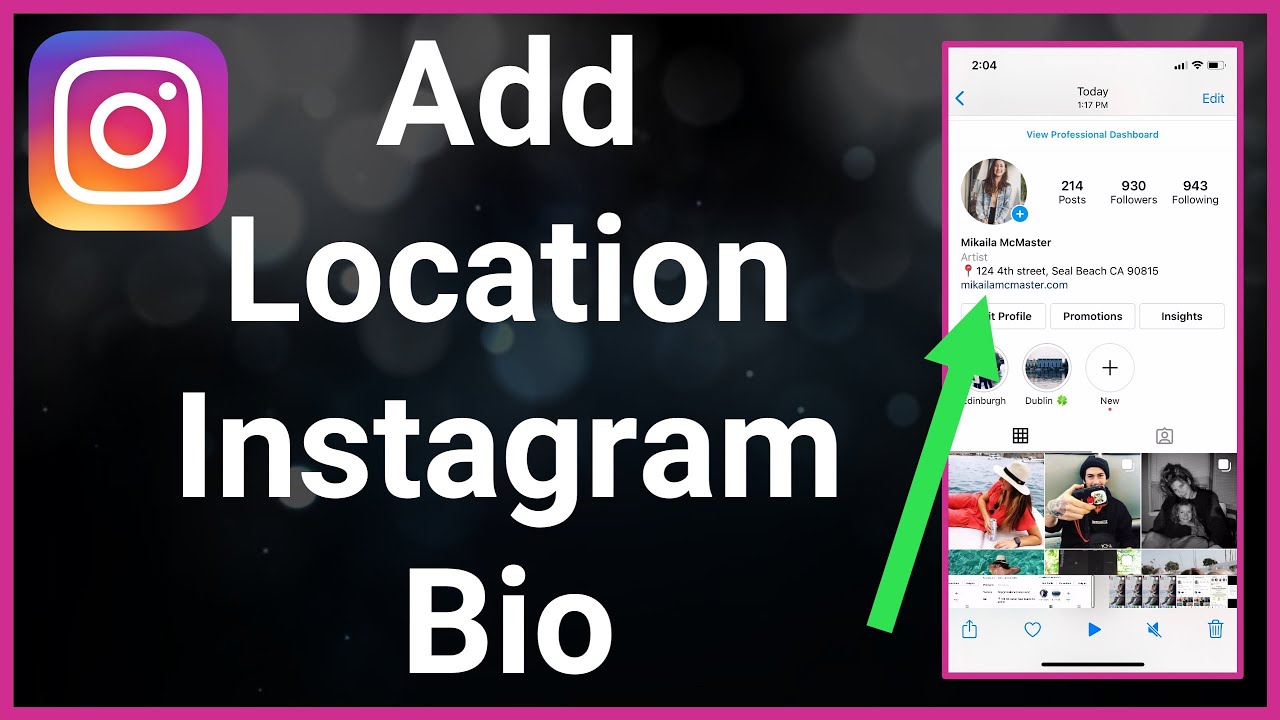
To add a location to your Instagram bio, tap the person icon on the bottom right of your profile page. Once on your profile page, click the “Edit Profile” button near the top right corner.

This will open a new page detailing your profile information, such as bio, website, phone number, and more. Scroll down until you reach the “Bio” field, and click on it to add text. After entering your desired bio text, click “Add Location” next to it and enter the name of your desired location.
After adding this information, click “Done” to save any changes to your profile. The location entered will appear below your name when looking at your Instagram profile.
Paste the URL of the location page in the website field
When adding a location to your Instagram bio, you can paste the URL of the location page in the website field. To do this, open your Instagram profile and click “Edit Profile.” From there, scroll down to the Website section and paste in the URL link of your location page.
The advantages of adding a location to your Instagram profile include helping potential followers find you more easily, improving search engine optimization (SEO) for your business or brand, boosting media engagement, and allowing people to identify when and where you are posting content. This makes it easier for them to keep up with what’s happening around them in real time.
Click “Done”
To add a location to your Instagram bio, open the Instagram app on your device first. Once inside the app, click the “Edit Profile” option in the settings menu.
Then, scroll down until you reach the “Location” field. Here, you can type in your current or desired location and tap “Done” when finished.
You can also add a location by selecting a Location tag from the options that appear after typing in your desired location in the Location field. After tapping on one of these options, click “Done” to save your change and update your Instagram bio with this information.
This is an easy way for users to discover where you’re located, and it also helps out with geo-tagging your posts for better visibility on explore pages.
Test Your Location
Adding location to your Instagram bio can be a great way to connect with your local community and even the broader world. It’s easy to add a location to your bio, but it’s important to test it first.

This article will detail how you can test the location before adding it to your Instagram bio. Let’s get started.
Go to your profile page and check if your location is visible
To ensure your location is visible on your Instagram profile, open your account and go to the profile page. You will see several options at the bottom of your Bio section.
Click “Edit Profile”, and then scroll down to the Location option. Check if there is a location tag listed in the fields. If a location is not showing up in this box, click “Add a Location” and select one from the list.
If you have enabled GPS on your device, Instagram will suggest nearby locations for you to choose from. You can also type in an address to look for a more specific location near you.
Once you have selected an appropriate location, save the changes and check if the new tag appears correctly on your profile page. If it does not show up immediately, try refreshing the page.
Test the link to make sure it works properly
Once you have created your Location page, it’s important to test the link to ensure it works properly. To do this, you may need to open a secondary browser or device to view your Location as a potential visitor.
If you use an online URL shortener like Bitly, ensure the link works properly and takes me to the correct destination. If you’re manually creating a Location link on Instagram, copy the web address from the address bar at the top of your browser window and paste it into a note on your device or paper for reference.
To test if your fans are taken to the correct webpage via the link provided in your bio, go through all of these steps:
- Access your profile page on Instagram and click on ‘Edit Profile
- Copy and paste a newly created link
- Click ‘Done’ to save
- Revisit the profile page by either clicking the back button or typing the URL again in the browser
- Click ‘Edit Profile again and check if the copied URL has changed to match the newly created one
- Open a new browser tab and paste the copied URL location into the search bar
- If using Bitly- get redirected to the web address- click on it
- If you manually create your location page with Instagram – the redirect should take you directly to the desired website
By following these steps, you will know that everything is working as expected when viewers follow and access links from their accounts via yours!
Tips for Optimizing Your Location
Adding a location to your Instagram bio is a great way to personalize your profile and add authenticity. It can also help potential customers or followers to find you easily.
You can use a few tips and tricks to optimize your location. This section will cover helpful tips to ensure your location is shown in the best light possible.
Use relevant hashtags
Hashtags are a great way to increase your reach and visibility on Instagram, especially regarding location-specific posts.
Hashtags can denote the city, state, or region you are posting from, but make sure you don’t use too many, or it can be overwhelming.
When using hashtags, include generalized terms such as #LA and specific terms such as #LosAngeles, as this will aid in your targeting efforts.
You should also consider using local landmarks and businesses in your hashtags if it helps contextualize the post for followers who may not be familiar with the area.
Additionally, it’s important to remember that some users prefer not to share their location, so using generic terms whenever possible can help ensure a wider reach.
Include a call-to-action
Including a call-to-action to your location can be an effective way to drive engagement and increase sales.
Not only does this let followers know where they can find you, but it also encourages them to take the next step in the sales process. Ask them to follow your store, check out a sale or promotion, or even come in for samples.
Additionally, if you have multiple locations, putting ‘Visit Any Location’ as a call-to-action can encourage customers to visit nearby locations. This allows them to experience the full scale of what you offer instead of having just one specific location on their mind.
Be sure that whatever call-to-action you include in the location section of your Instagram bio is clear and concise so that people understand how they can interact with your store from there. Additionally, including a link directly to your store page or website within the text will make it much easier for customers to take action immediately after reading it.
Use a branded hashtag
A branded hashtag is an easy way to enhance your location information. This is a hashtag you create yourself and use with the name of your business or destination.
Brand hashtags help build brand awareness and attract more Instagram followers, who can post their photos connected to your hashtag.
For example, if you have a restaurant in Paris called La Petite, researching #LaPetiteParis will show you how many posts have been made using this hashtag—and indicate if it is an existing and popular tag for people visiting Paris, making it the perfect branded Instagram hashtag for your location.
This adds a local flavor to your scheduled posts and stories and provides another avenue for other users to find you easily when searching for local attractions on Instagram.
When adding branded hashtags to your bio description, make sure not to include too many—just enough so potential customers can get an idea of what they might find on your profile!
Table of Contents