If you’re a fashion enthusiast, you know that the right nail art can elevate your entire look. From chic office environments to glamorous evening outings, elegant nails are a fundamental part of making a statement.
This collection of 28 classy nail ideas is designed to inspire your next manicure, whether you’re preparing for a big event or want to feel fabulous on any day. Each design blends fashion-forward trends with timeless elegance, ensuring you’ll find something perfect for every occasion. Get ready to pin these ideas to your boards and step up your nail game!
1. Classic French Twist
The classic French manicure is always a staple, but why not give it a modern twist? Opt for a slightly curved white tip instead of the straight line, or use pastel colors like soft lavender or mint green for the tip instead of white.
Tips for achieving the perfect French twist:
- Start with a nude base to keep it elegant. An excellent option for this is a Gel Nail Polish Kit, which provides a variety of colors to find your ideal nude.
- Use thin brushes for precision in the tips. The Nail Art Brush Set is perfect for creating those precise lines and curves, making your French twist look professionally done.
- Finish with a glossy topcoat for that salon shine. The Top Coat Nail Polish provides your nails with a high-gloss finish while also protecting the color and extending the life of your manicure.
This design is versatile enough to wear in any setting, from a corporate meeting to a brunch date with friends.
2. Minimalist Dot Art

Less is often more in the world of fashion, and minimalist dot art is the perfect example. A simple base color adorned with tiny dots of contrasting colors can look incredibly chic.
To achieve this look, start by selecting a base color, such as soft beige or pale pink. For adding those stylish dots, consider using a Dotting Tools Set, which includes five dotting pens and three nail painting brushes. This set makes it easy to create dots in various sizes, ensuring precision and creativity in your design.
Playing with color combinations is key to mastering this art. Think navy blue and gold or white and lilac for a sophisticated touch. For your contrasting colors, the nail polish set offers 15 bright colors that are perfect for both base and accent hues. The quick-dry formula saves time and helps prevent smudging, which is especially useful for intricate designs.
Finally, to enhance your detailing skills, a nail art brush set is an excellent addition to your toolkit. With various brushes designed for dotting and fine line work, you’ll have everything you need to bring your minimalist dot art vision to life.
This nail art style works well for both everyday wear and special occasions, making it a popular choice among minimalist fashion lovers.
3. Metallic Ombré

Metallic finishes are all the rage, and an ombré effect can make them even more stunning. By blending a metallic shade into a darker color, you can achieve a dramatic look that is sure to catch eyes.
Steps to create metallic ombré nails:
- Start with a light metallic base; silver or gold from a metallic nail polish set works beautifully. This set includes a variety of colors, making it easy to find the perfect metallic shade for your base.
- Use a sponge, such as the ones found in makeup kits for nail art, to dab on your darker shade (such as deep plum or midnight blue) at the tips. These soft sponges are explicitly designed for nail art, ensuring a smooth, blended effect.
- Seal your design with a high-gloss topcoat, such as the High-Gloss Topcoat, to amplify the metallic shine. This topcoat not only enhances the shine but also protects your manicure, making it chip-resistant and long-lasting.
This design is perfect for formal events or nights out when you want to bring a bit of glamour to your manicure.
4. Elegant Marble

Marble nail art is a stunning way to bring elegance to your fingertips. This look mimics the timeless beauty of marble stone and can be tailored to suit any color palette.
To create marble nails:
- Start with a light base color (white or pale gray).
- Swirl a darker color (black or navy) into the base using a thin brush or a nail art tool. For precision, consider using the Nail Art Brush Set, which includes a variety of brushes that are perfect for creating those intricate swirls.
- Finish with a glossy topcoat to seal the design. The Gel Top Coat provides a long-lasting shine and helps to protect your artwork.
The beauty of this art is its uniqueness; no two nails will ever look the same, making it a great conversation starter. If you’re looking to add fine details, the Nail Art Dotting Tools can help you achieve those perfect accents with ease.
5. Negative Space Designs

Negative space nail art is one of the hottest trends, allowing for creativity without overwhelming the eye with too many colors. This design incorporates bare nails as part of the art, creating a striking visual contrast.
How to nail this trend:
- Apply a clear or nude base using a high-quality polish, such as a nude nail polish, which is opaque, chip-resistant, and fast-drying.
- Use tape to block off sections of your nails and paint different colors in those areas. The nail art tape is perfect for this technique, providing the precision you need to create clean lines.
- Remove the tape to reveal the negative space.
This style is particularly chic and modern, perfect for adding a subtle edge to your outfit. For a pop of color, consider using a set like the colorful nail polish set, which offers a variety of shades to mix and match with your negative space design.
6. Jewel Tones

Deep jewel tones like emerald green, sapphire blue, and ruby red can transform your nails into a canvas of luxury. These rich colors work beautifully for any season and pair elegantly with any outfit.
To achieve this look, start by selecting your favorite jewel tone as a base. For the perfect finish, consider applying a glossy topcoat like Beetles Extra Glossy Top Coat, which enhances the richness of the color and gives your nails a stunning shine.
For a playful twist, try mixing and matching colors; a deep green on one hand and a royal blue on the other can create a fun yet sophisticated vibe. If you’re looking to add intricate designs, a nail art brush set can be an excellent tool for creating detailed patterns and accents.
Jewel tones are especially popular during the fall and winter, making them a go-to choice for holiday parties. To start your collection, the L.A. COLORS Color Craze Nail Polish, Jewel Tone is an affordable option to get you on your way to a chic nail look.
7. Textured Elegance

Texture adds another layer of sophistication to nail art, and you can achieve this look using matte finishes, glitter, or even gel overlays. For instance, a matte base using Beetle’s matte gel top coat creates a stunning contrast when paired with glitter tips. This fine glitter nail polish can easily be applied on the tips for an eye-catching sparkle that remains chic.
To incorporate texture into your nail art, here are some tips:
- Use a matte top coat like the Beetles option above on your base color for a sleek, sophisticated look.
- Add a layer of fine glitter on the tips with the Wet N Wild glitter top coat for a sparkly finish.
- Choose a versatile base color from a gel nail polish set, such as the JODSONE gel nail polish set, which includes a variety of shades that can stand alone if needed.
This textured look is perfect for adding a little flair to your everyday style without being too over the top.
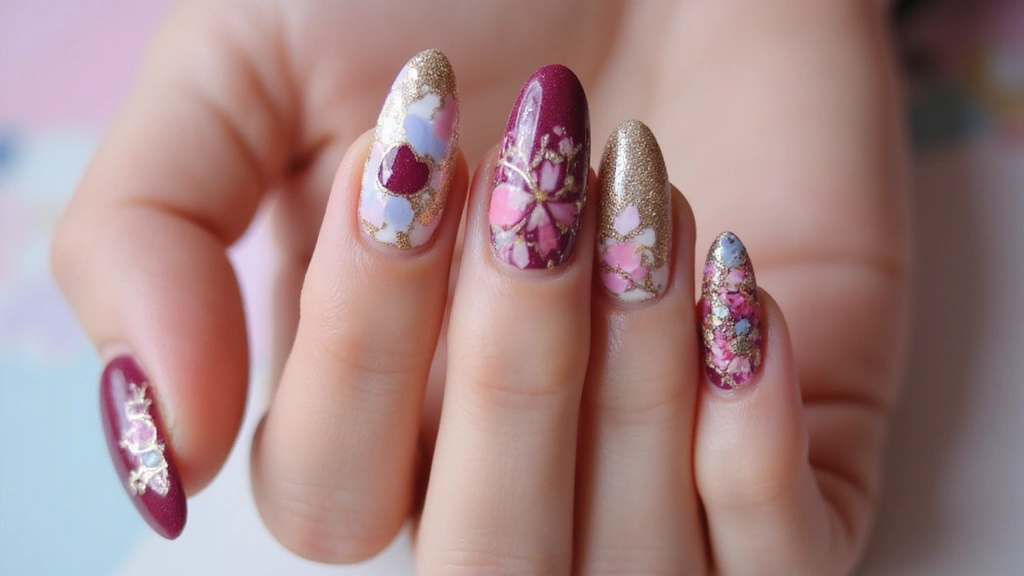
8. Floral Accents

Floral designs are timeless and can be made classy with the right color combinations. A delicate floral accent nail amidst a more subdued palette can add a touch of femininity and sophistication.
Tips for elegant floral nail art:
- Choose a neutral base color and a few contrasting colors for the flowers. Consider using the nail polish set (neutral and floral colors) for a perfect range of hues that complement each other beautifully.
- Use a fine brush to create intricate designs; the nail art brush set is ideal for this, as it includes a variety of brushes that will help you achieve detailed, miniature roses or dainty daisies.
- Keep the accent nails subtle by using only one or two flowers, and enhance your precision with nail art dotting tools that allow for more control over your designs.
This style is perfect for spring and summer and is suitable for weddings or brunch dates.
9. Geometric Patterns

Geometric patterns bring a modern twist to nail art, embracing bold lines and shapes that are eye-catching yet classy. For a clean, stylish design, start with a base color; opting for white or black works best.
The Nail Art Tape is ideal for creating precise lines, allowing you to fill in different sections with contrasting colors easily. Whether you prefer a monochromatic color scheme for a more subdued look or vibrant colors for a statement, the Nail Polish Set (Monochromatic Colors) offers a variety of options to suit your style.
Once you’ve crafted your design, complete the look with a glossy finish. Using the Glossy Top Coat will enhance the design, ensuring a long-lasting shine that adds an extra touch of sophistication. This nail design is ideal for fashion-forward individuals who want to make a statement.
10. Glitter Gradient

Glitter gradient nails are a fun way to add sparkle without overwhelming your look. This style works beautifully for both casual and formal occasions.
For a chic glitter gradient:
- Start with a base color that matches your outfit or mood. A great product to consider is the Modelones Nail Polish Set, which includes a beautiful selection of colors like red, nude, and gold glitter. This set is perfect for creating that ideal base.
- Apply glitter polish starting from the tips, gradually fading it down the nail. The Nail Art Brushes Set can help you achieve a smooth transition with precision, making it easier to blend the glitter for that stunning gradient effect.
- Seal the design with a topcoat for longevity. The Sally Hansen Double Duty™ serves as both a base and top coat, ensuring your nails maintain a streak-free shine while protecting your design.
This design is perfect for special events, such as weddings or nights out—just the right amount of sparkle!
11. Color-Blocked Chic

Color blocking brings bold contrasts and fun combinations to your nails, celebrating the beauty of clashing colors while maintaining a sophisticated look.
To achieve color-blocked nails, start by choosing at least three colors that complement each other. For a striking finish, consider using a nail polish set that offers a vibrant selection, such as the 15 bright colors 0.27oz air quick dry nail polish gift set. This ensures you have plenty of options to mix and match for your design.
Next, use tape to separate sections of the nail; this is where nail art tape comes into play. This handy washi masking tape helps create clean lines and defined sections, allowing you to fill each area with a different color without the mess.
Be adventurous with your combinations! Think orange, teal, and pink for a summer vibe. Color-blocking is a playful approach to nail art that can easily enhance your fashion statements.
12. Elegant Stripes

Stripes can elevate a simple nail design to something truly chic. Whether you choose vertical or horizontal stripes, they can be playful or classic depending on how you style them. To help you achieve that perfect striped look, consider using nail tape for nail art. This product ensures clean lines when painting your stripes, making your design look polished and professional.
Start with a base color that sets the tone for the stripes—white or nude shades work wonderfully for this style. An excellent option for your color selection is the nail polish set (white and nude colors). This kit provides a range of beautiful shades to create the perfect foundation.
Once your base is dry, experiment with different widths for your stripes. Thick stripes can create a bold statement, while thin lines can add a delicate touch. For precision application, you might want to use a nail art brush set. This set includes various brushes that are ideal for drawing straight lines and intricate designs, ensuring you get the exact look you desire.
This striped design is versatile and can be adapted for any season or occasion, perfectly enhancing your chic outfit.
13. Artistic Swirls

Artistic swirls are a dynamic way to express your creativity. This design allows for fluidity and color combinations that can be as bold or subtle as you desire. To get started on your swirl nail art, begin with a neutral or pastel base color using a set like the Nail Polish Set (pastels and neutrals). It offers a perfect selection of shades to set the stage for your artistic expression.
Next, use a fine brush to create swirling patterns in contrasting colors. The Nail Art Brush Set is an excellent tool for this step, providing you with a variety of brushes designed for intricate designs and long lines, ensuring your swirls come out beautifully. Don’t worry if they’re not perfect; the beauty of this design lies in its uniqueness.
For added detail, consider using Nail Art Dotting Tools to add fun dots or highlights to your swirls, enhancing the overall look. This artistic approach is perfect for those who love an abstract, modern look that adds interest to their manicure.
Nail art is your canvas – let those artistic swirls flow! Embrace the beauty in imperfections and create a look that’s uniquely you. Fashion isn’t just worn; it’s expressed!
14. Classic Polka Dots

Polka dots are a classic nail design that never goes out of style. They can be dressed up or down depending on the base colors, making this design playful yet refined, suitable for various occasions.
To achieve the perfect polka dots, start by choosing a chic base color. An excellent option for your base is the nail polish set (chic base colors), which offers a variety of bright and stylish shades. Then, use a dotting tool set for precision. This set not only includes dotting pens but also painting brushes that help you create detailed designs with ease.
Make sure to space out the dots evenly for a polished look, and consider mixing sizes to add an interesting dimension to your design. For those who want to elevate their nail art, the nail art brush set is ideal for adding fine details and intricate designs. This timeless polka dot look is perfect for casual outings, but can easily be enhanced for a more formal appearance with a darker color palette.
15. Vintage Lace

Lace motifs can add a vintage, feminine touch to your nails. This intricate design can be achieved with stamps or freehand painting, making it perfect for those who love a more delicate approach. To get started, consider using a solid base color to set the stage for your lace art. For creating the lace patterns, a nail art stamping kit can make the process easier and more precise, especially with its variety of designs that can elevate your lace game.
For those who prefer freehand techniques, a fine detail nail art brush set is essential. With brushes designed for fine lines and intricate details, you can achieve a delicate look that genuinely stands out, reminiscent of lace.
Lastly, using a contrasting color, such as white on a deep red or black on nude, can make your design stand out. A nail polish set with contrasting colors gives you the perfect shades to choose from, ensuring your lace design is as eye-catching as it is elegant. This design is charming for weddings or special occasions, adding a romantic flair to your overall look.
16. Ombre Elegance

Ombre nails have gained popularity for good reason—they’re effortlessly chic and can be done in any color combination. This design transitions smoothly from one shade to another, creating a visually appealing gradient effect.
How to achieve ombre nails:
- Choose two or three complementary colors. A great option is the nail polish set with complementary colors, which offers a variety of shades to help you create that perfect transition.
- Use a makeup sponge, like the nail art ombre sponge, to dab and blend the colors starting from the tips of your nails. This tool is ideal for achieving a smooth gradient effect without uneven patches.
- Finish with a glossy topcoat, such as the high-gloss topcoat, to unify the look and provide a chip-resistant, long-lasting shine that will keep your ombre nails looking fresh.
This design can be a subtle touch or a bold statement, depending on your color choices.
17. Whimsical Splotches

For those who appreciate a playful touch, whimsical splotches can bring a fun, youthful vibe to your nails. This style is great for casual outings or when you want to express your spirited side.
Tips for whimsical splotches:
- Starting with a clear or nude base, use a brush to create irregular splotches of color. An excellent tool for this is the Nail Art Brush Set, which includes various brushes for different effects, ensuring you achieve the perfect whimsical look.
- Experiment with contrasting colors for a lively look. The Nail Polish Set (Assorted Colors) offers a vibrant selection to play with, allowing your creativity to shine through.
- Keep the shapes random and fun to maintain the whimsical feel. To complete your design and ensure it lasts, apply a layer of Base Coat and Top Coat Nail Treatment for a quick-drying, long-lasting shine.
This style is perfect for summer or anytime you want a lighthearted touch.
Let your nails tell a story! Embrace whimsical splotches for a playful, elegant vibe that reflects your spirited personality. Life’s too vibrant for a dull manicure!
18. Bohemian Feathers

Feather motifs can add a bohemian touch to your nails, perfect for festivals or relaxed summer outings. This design can be delicate and stylish, giving your manicure a free-spirited vibe.
How to create feather nail art:
- Start with a light base color using a pastel nail polish set for a soft, summery look.
- Paint simple feather shapes using a thin brush, which can be achieved with a nail art brush set. The fine brushes will help you create those delicate details in earthy tones or pastels.
- Add fine detailing with a contrasting color for dimension, and if you want to make it even easier, consider using nail art stencils to guide your designs.
This nail art style is especially popular in the warmer months, embodying the carefree spirit of summer. With the right tools and colors, you’ll have a stunning bohemian manicure that’s sure to impress!
19. Elegant Sharp Edges

Sharp edge designs, featuring pointed tips painted in chic colors, can give a modern edge to your look. This style is bold and fashion-forward, perfect for those who like to make a statement.
To achieve sharp edges, start with a color that speaks to you, then shape your nails into a stiletto or almond shape. Consider using a nail file set for shaping to get those perfectly pointed tips. Once your nails are shaped, paint them in a solid color or add geometric patterns for an extra touch of flair. A high-gloss top coat can enhance the sharpness of the edges and give your nails a stunning finish.
For those looking to get creative, a nail art brush set can help you add intricate designs and details, taking your look to the next level. This design is great for fashionistas who are always on the cutting edge of style.
20. Artistic Splatter

Artistic splatter nails can be a fun and unique way to express yourself. This playful design involves splattering different colors for a modern, creative flair. To create this look, start with a base coat and let it dry completely.
Then, use a small brush or an old toothbrush to flick paint onto your nails. An excellent option to consider is the Nail Art Brush Set, which includes various brushes that are perfect for detailed designs.
Experiment with different colors for contrast; bright colors on a dark base can look especially striking. The Nail Polish Set (Bright Colors) is an excellent choice, offering a vibrant palette to bring your splatter design to life.
If you want to try the toothbrush technique for a more textured effect, the toothbrush for nail art is a budget-friendly and effective tool. This design is best for casual outings and is sure to spark conversations wherever you go.
21. Luxe Velvet

Velvet nails bring a luxurious touch to your manicure. This design features a soft, textured finish that resembles velvet fabric, adding an elegant twist. To create this chic look, you’ll need some essential products.
Start with a base coat, like OPI Nail Lacquer Base Coat, which will protect your nails and prevent discoloration. Once the base is dry, apply a special velvet powder while the polish is still wet. An excellent option for this is the velvet nail powder, which is perfect for achieving that plush texture. Gently press the powder into the wet polish to create the desired look.
Finally, finish with a top coat to protect your stunning velvet design. The OPI Nail Lacquer Top Coat is ideal for this, as it’s chip-resistant and provides a high-gloss, long-lasting finish. This design is especially popular during cooler months, adding a cozy yet chic vibe to your style.
22. Polished Jewels

Jewelry-inspired nail designs can elevate any look, adding a touch of elegance and glamour. To achieve a dazzling effect, consider using rhinestones, studs, or gems.
To create jewel-inspired nails:
- Begin with a solid base coat to create a clean background. An excellent choice for this is Sally Hansen Double Duty™, base and top coat, which provides a smooth and durable foundation for your design.
- Use nail glue to apply gems or rhinestones in clusters or singular designs on your nails. The KISS PowerFlex maximum speed nail glue is ideal for this task; it features a super-strength formula that ensures your embellishments stay securely in place.
- Finally, seal your masterpiece with a topcoat to keep everything intact. The topcoat also adds a glossy finish, enhancing the overall look of your nail art.
For extra bling, consider options like Makartt rhinestone glue, specifically designed for securing various nail charms and gems. This design is perfect for special occasions, ensuring you shine bright and stand out with that extra sparkle to your ensemble.
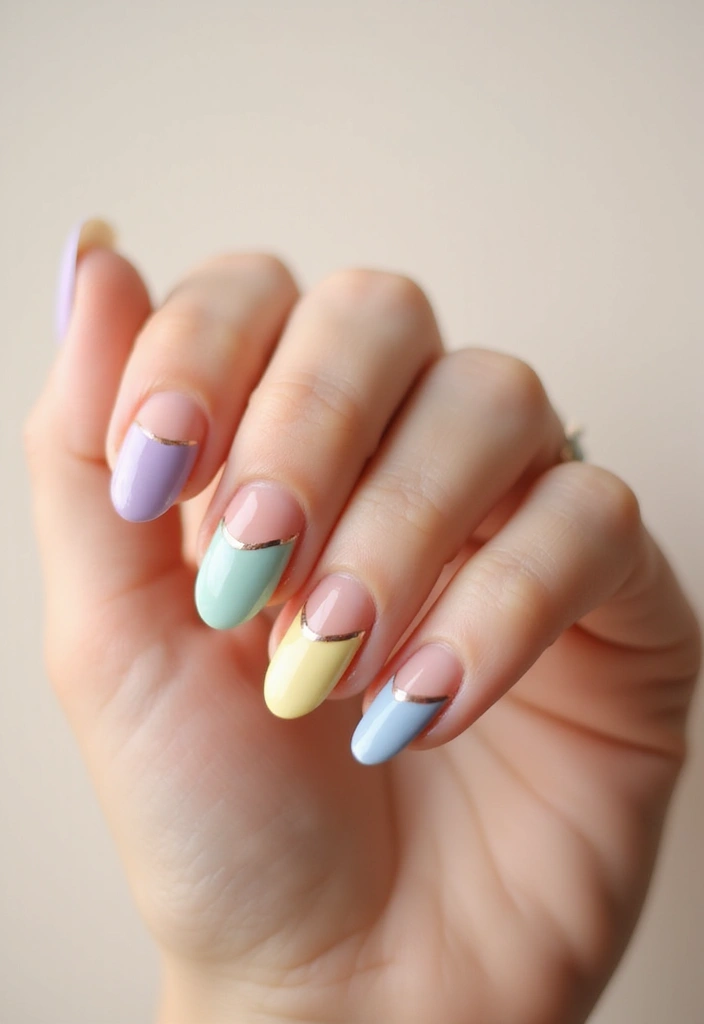
23. Soft Pastel Hues

Pastels are a beautiful way to keep your nails elegant yet playful. Soft colors like mint, peach, and lavender can brighten any look without being overpowering. To achieve this look, start by applying a base coat in your favorite soft pastel shade using a pastel nail polish set. This kit features 15 delightful pastel colors that make it easy to find the perfect hue for any occasion.
Once your base coat is applied, finish with a glossy top coat, such as the Glossy Top Coat from OPI. This top coat not only enhances the pastel finish but also provides a chip-resistant, high-gloss look that protects your nails and keeps them looking fresh.
For a fun twist, consider mixing and matching different pastel shades on each nail. To add intricate designs or dots, you can use a set of nail art dotting tools. These tools are ideal for creating distinctive nail art that enhances your pastel manicure.
Pastels are perfect for spring and summer and can add a fresh feel to your overall style.
Pastel nails are like a breath of fresh air – playful elegance that brightens your style! Mix soft hues for a chic twist that’s perfect for any season.
24. Chic Neon

Neon colors can be a fun and bold choice for nail art, bringing a lively energy to your look. When styled appropriately, neon nails can be surprisingly classy.
To create chic neon nails:
- Choose neon colors that complement each other. A great option is the Morovan 15 bright color air quick dry nail polish gift set, which offers a vibrant selection to mix and match.
- Apply a matte or high-gloss topcoat to finish the look. The OPI matte top coat for nails provides a smooth, sophisticated finish while ensuring your neon colors remain bold and eye-catching. Alternatively, for a shiny finish, the OPI high-gloss top coat for nails adds a gel-like shine that enhances the vibrancy of your neon shades.
- Pair neon nails with neutral outfits to allow them to stand out without clashing. This design is perfect for summer festivals or nights out dancing, bringing a pop of color that is hard to ignore.
Dare to be bold! Chic neon nails can elevate your fashion game—pair them with neutrals for a classy pop. Embrace the vibrant energy and let your nails shine at every summer festival or night out!
25. Twinkling Stars

Starry night nails can add a magical touch to your look. This design plays with the beauty of the night sky, using deep colors and sparkles to create a celestial effect.
How to create starry nails:
- Start with a deep blue or black base. For this, you can use GAOY deep blue gel nail polish to achieve a gorgeous midnight hue that sets the perfect backdrop for your stars.
- Use a fine brush to paint tiny stars in white or metallic shades across your nails. An excellent tool for this task is the Nail Art Brush Set, which includes a variety of brushes that make detailing a breeze.
- Add a layer of Glitter Nail Polish for extra sparkle, enhancing the whole celestial vibe.
This design is perfect for evening events or any occasion when you want to feel a bit more whimsical.
26. Tropical Vibes

Tropical nail art can bring the essence of summer to your fingertips, especially if you’re longing for a beach getaway. Bright colors and palm tree designs create a cheerful, vacation-like feeling, making these nails perfect for summer parties or whenever you want to feel like you’re on holiday.
To achieve your tropical look, start with a bright base, like coral or teal. An excellent exception for this is the Bright Nail Polish Set, which offers a variety of vibrant shades to choose from.
Next, use a fine brush to paint palm tree silhouettes or tropical flowers. The Nail Art Brush Set features a variety of brushes, perfect for creating detailed designs with ease.
To add a touch of sparkle, consider incorporating a few small dots of glitter for a shimmering effect. For this, the Nail Glitter Kit is ideal, as it includes fine nail glitter along with other decorative elements, such as rhinestones and sequins, to elevate your nail art.
With these products, you’ll be well-equipped to create stunning tropical nails that capture the essence of summer.
27. Soft Ombre Floral

Combining two popular trends, soft ombre floral nails merge gradient effects with floral designs for a stunning look. This style is perfect for spring and adds a romantic touch to your nails.
How to get this look:
- Start with a soft ombre effect using pastel colors. The pastel nail polish set is great for this, offering a variety of soft colors to create that beautiful gradient.
- Once dry, use a fine brush to paint delicate floral designs over the gradient. The fine detail nail art brush set provides you with the precision tools needed for intricate designs, making it easier to achieve those lovely floral patterns.
- Seal everything with a glossy topcoat for extra shine. A glossy top coat nail polish will not only enhance the shine but also ensure your stunning design lasts longer.
This style is perfect for weddings or romantic dates, adding a delicate charm to your look.
28. Unique 3D Elements

For the adventurous spirit, consider adding unique 3D elements like bows, charms, or embellishments to your nails. This design adds dimension and is a fun way to express your personality.
How to create 3D nail art:
- Use a solid base color for a clean backdrop.
- Adhere 3D elements using KISS PowerFlex maximum speed nail glue after the polish has dried. This super-strength formula ensures that your embellishments stay securely in place, allowing you to flaunt your creativity without worry.
- Finish with a Sally Hansen Double Duty top coat to hold everything in place while providing a quick-drying, long-lasting finish.
To enhance your design, consider using the Nail Art 3D Charms Set, which includes a variety of cute and colorful elements like butterflies and flowers that can add a whimsical touch to your nails. This design allows for endless creativity, making it perfect for those who love to stand out.
Conclusion

In the world of fashion, your nails can be just as expressive as your wardrobe. From elegant florals to chic geometric designs, these 28 classy nail ideas are perfect for any occasion.
Remember to incorporate your personality into your nail art, making each design truly yours. Whether you’re a fan of bold colors or subtle elegance, there’s a nail idea here that will resonate with you. Get creative and let your nails do the talking!
Note: We aim to provide accurate product links, but some may occasionally expire or become unavailable. If this happens, please search directly on Amazon for the product or a suitable alternative.
This post contains Amazon affiliate links, meaning I may earn a small commission if you purchase through my links, at no extra cost to you.
Frequently Asked Questions
What Are Some of the Most Trendy Nail Art Ideas for This Season?
If you’re looking to stay ahead in the world of nail fashion, some of the most trendy nail art ideas include metallic ombré, negative space designs, and elegant marble looks. These styles are not only chic but also versatile enough to suit any occasion, from casual outings to formal events.
Experimenting with these trendy manicures can help elevate your look and keep your nails on point!
How Can I Achieve a Pinterest-Worthy Nail Design at Home?
You can absolutely achieve a Pinterest-worthy nail design at home with some practice and the right tools! Start with a clean base and choose a chic nail design, such as minimalist dot art or color-blocked chic. Use quality nail polish and consider investing in some nail art tools, such as dotting tools or nail brushes.
Don’t forget to finish with a top coat for that professional shine!
Are There Any Specific Nail Colors That Are Always in Style?
Absolutely! Specific nail colors remain timeless and can be considered staples in any fashion enthusiast’s collection. Classic neutrals, elegant jewel tones, and soft pastels are always in style. These colors can easily transition from season to season, making them versatile choices to complement any outfit.
Adding a trendy twist, like a metallic finish or a unique design, can make these classic shades pop!
What Nail Art Trends Should I Avoid for a Classy Look?
While nail art is all about personal expression, some trends may not align with a classy aesthetic. Avoid overly busy designs, such as excessive glitter or clashing neon colors that could overwhelm your look. Instead, opt for chic nail designs that feature minimalist or elegant accents, such as floral motifs or sleek stripes.
Ultimately, go for what makes you feel confident and stylish!
How Can I Maintain My Nail Art for Longer Lasting Results?
To keep your nail art looking fresh and fabulous, start with a good base coat and finish with a quality top coat to seal in your design. Apply a top coat regularly, every few days, to maintain the shine and prevent chipping. Additionally, be mindful of your hands—wear gloves while doing household chores to protect your nails.
Additionally, consider scheduling regular manicures to keep your nails healthy and maintain ur designs fresh!
Table of Contents