If you want to elevate your nail game without breaking the bank, you’ve landed in the right spot. These classy nail art designs are just the ticket to turn heads while keeping your wallet happy.
From elegant monochromes to vibrant pastels, each design brings a touch of luxury that’s easy to achieve at home with the proper techniques and materials. Get ready to adorn your fingers with nail art trends that scream sophistication without the hefty price tag!
1. Elegant French Twist
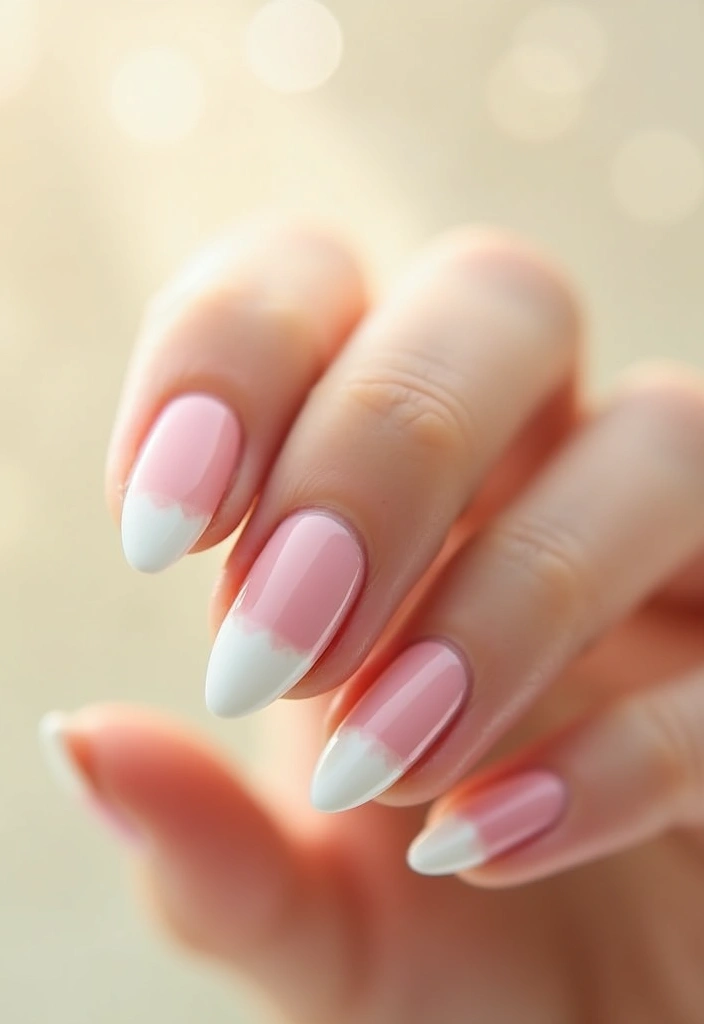
The classic French manicure takes on a fresh twist with this version that combines the timeless white tip with a subtle pastel base. Choosing soft colors like blush pink for the base elevates the look, while the white tip maintains that chic essence.
To achieve this elegant look, start by applying a protective base coat, such as OPI Nail Lacquer Base Coat. This clear nail polish not only protects your nails but also prevents discoloration, ensuring your manicure looks pristine.
When it comes to painting those crisp tips, using tape can make a world of difference. Consider using nail art tape for straight lines. It provides the precision you need for that flawless finish.
Finally, seal your masterpiece with a glossy top coat. A great option is Top Coat Nail Polish, which dries quickly and delivers a long-lasting, high-shine finish.
This design pairs beautifully with any outfit, making it perfect for both casual and formal events.
2. Marbled Elegance

Marble nail art looks complicated but is surprisingly simple to do. With just a few tools and a little patience, you can achieve a luxurious marble look right at home.
To achieve this stunning stone effect, you can use a mix of white and gray nail polish, such as the Sally Hansen Insta-Dri, White on Time. Start with a white base coat, then apply drops of your chosen colors and swirl them gently.
For optimal results, having the right tools is essential. The Nail Art Brush Set provides a variety of brushes perfect for creating those delicate swirls. At the same time, the Toothpick Nail Art Tool is excellent for precision work, allowing you to add intricate details to your design.
This design is perfect for making a statement and is ideal for any season!
Creating a marbled elegance on your nails is easier than you think! Just a swirl of colors and a dash of patience can elevate your nail game without breaking the bank.
3. Gold Foil Glam

Nothing says luxury quite like gold foil accents on your nails. This simple addition can elevate any color choice to something really special. To achieve this stunning look, apply pieces of gold foil from a gold foil nail art kit onto the wet polish and seal them with a top coat for longevity.
Here are some golden tips:
- Use a darker color as a base for a high-contrast effect.
- Ensure the base coat remains tacky to allow the foil to adhere.
- A matte top coat nail polish can give a sophisticated twist to the shine of the foil.
This design is great for parties or anytime you want to feel extra fancy! If you’re looking to refine your technique, consider using a nail art brush set to apply your polish and foil with precision.
A touch of gold can turn any nail design into a luxurious masterpiece! Remember, the secret lies in the details – a little foil goes a long way in making your nails shine.
4. Chic Geometric Patterns

Geometric nail art designs are trendy and can look incredibly sophisticated. By choosing a mix of contrasting colors, your patterns can really pop. Consider a cohesive palette of two or three colors to create a seamless look. Shapes like stripes, triangles, or dots can each yield a unique effect.
To nail this trend, start with nail art tape to create clean lines for your geometric shapes. This tape enables you to achieve precise edges, giving your designs a polished and professional look. Next, a dotting tool set can help you craft perfect circular designs with ease, adding a playful touch to your nail art. Finally, finish off with an OPI top coat nail polish to give your nails a high-gloss, chip-resistant finish that protects your artwork and enhances its longevity.
These tips and tools will surely make your nails the talk of the town!
5. Minimalist Monochrome

For those who appreciate minimalism, a monochrome nail design is the way to go. This style showcases a single color across all nails, which can look both classy and modern. Opt for shades like deep navy, forest green, or classic black. For an elegant touch, consider using the Essie salon-quality nail polish in deep navy, which offers a rich, vibrant hue perfect for this design.
Here’s how to achieve the perfect minimalist nails:
- Start with a good base coat, such as OPI nail lacquer base coat, to ensure smooth application and protect your nails from discoloration.
- Apply two coats of your chosen color for evenness.
- Finish with a high-gloss top coat, such as OPI nail lacquer top coat, which provides a salon-quality shine and enhances the longevity of your manicure.
This design is not only chic but also versatile enough for any occasion!
6. Glitter Gradient

Glitter gradients bring a fun twist to your nails while still looking classy. This sparkly effect can make your hands look glamorous without much effort.
Start with a solid base color and then apply glitter polish at the tips, fading it down the nail. For this, consider using the Glitter Nail Polish Set, which offers a vibrant range of colors perfect for creating that eye-catching gradient.
To create the perfect glitter gradient:
- Use a makeup sponge to dab the glitter for a smooth transition. The Makeup Sponges for Nail Art come in a convenient pack and are ideal for achieving the seamless blending effect you desire.
- Seal with a top coat, such as Top Coat Nail Polish, to prevent rough edges and enhance the shine of your design. This particular top coat is quick-drying and chip-resistant, ensuring your manicure stays flawless for longer.
- Mix different colors of glitter for a personalized touch.
This playful design is perfect for celebrations or anytime you want to add a touch of fun!
7. Statement Nails with Rhinestones

Adding rhinestones to your nails can instantly transform a basic design into a statement piece, adding sparkle and dimension without being overly extravagant. To achieve a balanced look, accentuate specific nails with rhinestones while keeping others simple.
For a stunning design, start by applying a bit of clear polish to the areas where you want to place the rhinestones. Using precision tweezers enables the precise placement of rhinestones, ensuring a neat finish. Once you’ve arranged the rhinestones to your liking, seal the design with a clear top coat, such as Sally Hansen Double Duty™, followed by a base coat and a top coat. This not only secures the rhinestones in place but also adds a streak-free shine.
For optimal adhesion of your rhinestones, consider using nail rhinestone glue. This super-strong gel ensures that your decorations stay intact, even during lively special occasions like weddings or parties!
8. Pastel Ombre

Ombre nails are a soft and stylish choice that gives a delicate flair, and using pastel colors for this effect can enhance that elegant vibe. To achieve a beautiful transition from light to darker hues, blend two or three shades for a stunning look.
Start with a white or nude base coat to create a clean canvas for your design. For pastel colors, consider using the Beetles pastel nail polish set, which offers six lovely shades, including pink, blue, and yellow, to help you achieve the perfect ombre effect.
Next, use a sponge to apply the colors—this is where the makeup sponge applicators come in handy. They are designed to help you dab lightly, ensuring a blended finish that looks professionally done.
Finally, seal your masterpiece with a top coat for a smooth texture. The Sally Hansen Double Duty base and top coat will provide quick-dry, long-lasting protection and a streak-free shine, ensuring that your pastel ombre nails stay beautiful for days.
This design is perfect for spring and summer, bringing a fresh feel to your nail art, and with just a few shades and a simple sponge technique, you can elevate your nail game without breaking the bank!
Pastel ombre nails are like wearing a sunset on your fingertips! With just a few shades and a simple sponge technique, you can elevate your nail game without breaking the bank.
9. Textured Velvet Finish

Bring out the luxurious feel with a velvet finish on your nails. This design features a unique texture that appears rich and sophisticated, making it ideal for special occasions or a night out. To achieve the stunning velvet effect, you’ll need a few essential products.
Start with a reliable base coat, such as Sally Hansen Double Duty™, Base and Top Coat. This quick-dry formula ensures a smooth foundation that enhances the longevity of your manicure.
Next, choose your desired nail polish color. A great option is the JODSONE 23 PCS Gel Nail Polish Set, which offers a variety of colors to suit any style.
Once your base color is applied, it’s time to add the velvet finish. Apply the FZANEST Matte Gel Top Coat while the polish is still wet for optimal results. This top coat provides the soft, matte texture you’re aiming for without any complications.
Finally, allow everything to dry completely to reveal the luxurious, textured finish that will elevate your nail game!
10. Boho Chic Feathers

Feather designs are modern and effortlessly chic, perfect for those who want something unique yet classy. To create these beautiful nail art designs, consider using the Nail Art Pens Set, which allows for intricate details with its fine brush tip. This set is ideal for drawing feather designs directly onto your nails, giving you the precision you need for a polished look.
If you prefer a more straightforward approach, using a Nail Stencil Kit can help you achieve professional-looking results without the hassle. These vinyl stencils offer a clean and consistent shape, making it easy to create beautiful feather patterns quickly.
For added longevity and shine, finish your design with Top Coat Nail Polish. This clear top coat not only protects your art from chipping but also enhances the overall finish, ensuring your nails look fabulous whether you’re at a festival or just going about your everyday routine.
Start with a neutral base, apply your chosen feather designs, and seal them with a top coat for a stunning, boho-chic look!
11. Creative Fruit Nail Art

Fruit-themed nail art is fresh, playful, and surprisingly sophisticated. Small designs, such as cherries, lemons, or watermelons, can add a fun twist to your look.
Use bright colors and fine brushes for accuracy.
To create your fruit designs:
- Start with a simple, colorful base.
- Paint small fruit slices and add details like seeds or leaves.
- Seal with a top coat for longevity.
This design is perfect for summer or when you want something light-hearted!
12. Classy Plaid

Plaid patterns may evoke coziness, but they can also look sophisticated on your nails. Select colors that complement each other well for a refined finish. For that elevated touch, this design shines with a matte finish, which can be achieved using a matte top coat nail polish.
To get started with plaid nail art, follow these steps:
- Begin with a base coat of your desired color; a great option is the base coat nail polish from Sally Hansen, which helps create a smooth canvas and ensures long-lasting wear.
- Use a thin nail art brush, like those in the nail art brush set, to create stripes in a contrasting color, allowing for precision in your design.
- Finally, seal it all with the matte top coat for that chic finish.
This design is perfect for enhancing your fall and winter looks!
13. Delicate Lace Accents

Lace designs can add that feminine touch to your nails while looking effortlessly classy. To achieve this elegant look, using a lace nail stamping kit can simplify the process and give you intricate designs without the fuss.
To create lace accents:
- Start with a solid color base.
- Use the lace stamping kit to transfer the design onto the nail for precision and ease.
- Finish with a clear top coat nail polish to keep that delicate look intact and ensure your art lasts longer.
For more detailed designs, consider incorporating a nail art brush set to add intricate details or touch-ups. This design is perfect for weddings or romantic dates, effortlessly elevating your style!
14. Bold Color Block

Color blocking is a playful, yet sophisticated way to express your style. This design utilizes contrasting colors to create a modern look that can genuinely make a statement. To achieve this bold look, pick a few vibrant colors and divide your nails into sections for a striking effect.
To master color blocking, consider using nail art tape to create straight edges between colors. This handy tool ensures clean lines, making your design look polished and professional. Additionally, it’s essential to make sure each layer dries before applying the next to avoid smudging.
To enhance the vibrancy and longevity of your nail art, finish with Sally Hansen Insta-Dri® clear top coat. This quick-dry formula provides a long-lasting, streak-free shine that will keep your nails looking fresh and fabulous.
For the perfect color palette, the Morovan neon nail polish set offers 15 vibrant colors that are sure to make your color blocking pop. This collection is ideal for summer outings or whenever you want to stand out with a fun and unique design!
15. Nature-Inspired Designs

Nature-inspired nail art can be both calming and beautiful. Consider floral designs, leaf patterns, or even serene landscapes to capture the essence of nature. To help you achieve this look, using a few key products can make the process easier and more enjoyable.
Start with a light base color for your nails. Then, to create your intricate designs, you can use the Nail Art Brush Set. This set includes a variety of brushes and tools, which makes it simple to paint delicate details or create bold patterns. If you prefer a quicker option, consider the Nature-Themed Nail Stickers. These stickers feature tropical leaf designs that effortlessly add a touch of nature to your nails without the fuss of painting.
Once you’ve completed your design, don’t forget to seal it with a glossy finish. The Glossy Top Coat Nail Polish will provide a beautiful shine and ensure your art lasts longer. This design is excellent for everyday wear or nature walks, showcasing your creativity and love for the outdoors!
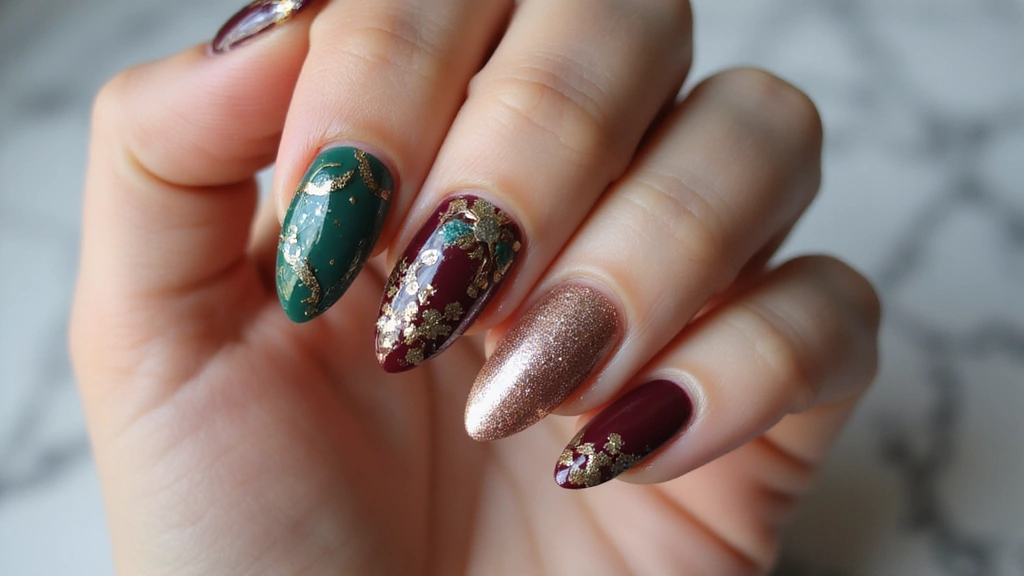
16. Vintage Glam

Vintage-inspired nail art can look effortlessly elegant and chic. Think muted colors and classic designs inspired by different eras.
Choose colors like burgundy, navy, or muted green to create your vintage look. To achieve this style, start with a solid color base. For the intricate patterns that embody vintage charm, Nail Art Pens are perfect. With precision tips, these pens let you create elegant vintage patterns like polka dots or swirls, making it easy to bring your nail art vision to life.
Once your design is complete, don’t forget to seal it all in with a top coat nail polish. A top coat not only provides long-lasting wear but also gives your nails a streak-free shine that enhances the overall elegance of your manicure.
For those who prefer to work with brushes, consider the nail art brushes set. This set includes various tools perfect for detailing and creating long lines, adding a professional touch to your designs.
This vintage glam design is perfect for a retro-themed party or any time you want that glamorous feel!
Elevate your style with vintage glam! A touch of burgundy or navy can transform your nails into a timeless masterpiece, perfect for any occasion that calls for a sprinkle of elegance.
17. Night Sky Designs

Bring the wonders of the night sky to your nails with celestial designs that feature stars, moons, and deep blue hues. This magical look can be achieved using a dark base color with white or metallic accents.
To create this enchanting look, start with a black or dark blue base coat. For the perfect application, consider using the Nail Art Brush Set, which includes a variety of brushes and dotting tools ideal for crafting intricate star and moon designs. Once your base is set, use white polish for stars and silver for moons to add a touch of sparkle.
Finally, to ensure your design looks polished and lasts, apply a glossy top coat like Top Coat Nail Polish. This will provide a streak-free shine and enhance the overall appearance of your nail art.
For those who need the perfect dark colors, the Gel Nail Polish Set (Dark Colors) offers a range of beautiful shades ideal for creating a stunning night sky effect. This design is perfect for evening events or whenever you want to add a bit of sparkle to your day!
18. Colorful Splatters

Embrace your artistic side with colorful splatter nail art. This fun, abstract design can be both bright and bold, making it a perfect way to express your creativity.
To achieve this playful effect, start with a white or nude base coat. For the splatter technique, consider using a Nail Art Brush Set that includes dotting and striping tools, giving you more control over your design. Alternatively, for a more dynamic approach, you can use a straw to blow splatters of paint onto your nails.
Once you’ve created your masterpiece, don’t forget to finish with a top coat. A reliable option is the Top Coat Nail Polish by Sally Hansen, which provides a quick-drying, long-lasting, streak-free shine that will seal in your artwork and keep it looking fresh.
For the splatter colors, you can use an Acrylic Paint Set for Nail Art, which offers a variety of hues in easy-to-use pens. This set allows you to create vibrant splatters without the hassle of messy bottles.
This playful design is great for casual outings or any time you want to showcase your artistic flair!
19. Watercolor Effect

Watercolor nails create a soft and dreamy look that feels both sophisticated and playful, mimicking the fluid motion of watercolor painting. To achieve this stunning art style, start with a white base coat for a clean canvas. Then, use a wet brush to blend colors, creating that beautiful watercolor effect. An excellent tool for this is the nail art brush set, which includes various brushes that help you master the blending technique effortlessly.
For your color palette, consider using pastel shades for a light effect or bold colors for a striking look. The pastel nail polish set is perfect for this, offering a range of delightful hues that are ideal for achieving a soft, watercolor vibe.
Finally, seal your masterpiece with a glossy top coat to ensure a shiny finish and long-lasting wear. The glossy top coat will not only enhance the beauty of your design but also protect it, making this design perfect for spring and summer events!
20. Seasonal Themes

Celebrate the seasons with themed nail art! Think fall leaves, winter snowflakes, spring flowers, and summer fruits. Seasonal designs can bring a fun twist to your manicure.
To create seasonal art, start by choosing a base color that represents the season. For precision in your designs, consider using the Nail Art Brush Set, which includes various brushes to help you add intricate details like leaves or snowflakes. These brushes make it easier to create the perfect seasonal accent that reflects your love for nature.
Once you’ve painted your designs, don’t forget to finish with a top coat for durability and shine. The Top Coat Nail Polish by Sally Hansen provides quick-dry, long-lasting protection, ensuring your seasonal art stays vibrant and chip-free.
If you’re looking for an even easier option, you might explore the Nail Art Stencils, which can make creating themed designs a breeze. With these stencils, you can achieve professional-looking results without needing advanced skills.
This is a creative way to express your love for the changing seasons!
21. Artistic Brush Strokes

Artistic brush strokes give your nails a painterly effect that feels unique and modern, allowing for creativity and self-expression. To achieve this stunning design, it’s essential to use the right tools.
Start with a base coat to ensure your design lasts. The base and top coat nail polish set from Beetles will provide you with a shiny finish and long-lasting wear, perfect for sealing your artwork.
For artistic flair, you’ll need a broad brush to apply strokes in various directions. The broadee nail art brush set is ideal for creating those beautiful, sweeping strokes that enhance the artistic effect.
Finally, consider using a vibrant array of colors to bring your design to life. The nail paint set offers 36 colors, giving you plenty of options to choose from, ensuring your nails become a canvas for your creativity.
This design is especially great for artsy individuals and anyone looking to showcase their creative side!
22. Cute Animal Prints

Animal print nail art can be playful and classy when done right. Think of minimalist leopard spots or chic zebra stripes. These designs can be subtle yet striking and are perfect for anyone who loves a bit of edge.
To create animal print designs, start with a neutral base using high-quality polish such as neutral nail polish. This light tan shade provides the perfect backdrop for your artistic expression. Then, use a thin brush from the nail art brush set to add your animal print patterns in a darker color, ensuring precision and clean lines.
Finally, seal your design with top coat nail polish for longevity and a streak-free shine. This step not only enhances the look of your nail art but also protects it, allowing your fun twist on classic nails to last longer. With these tips and products, you’ll have classy animal prints that are sure to turn heads!
23. Elegant Swirls

Swirl designs are delicate and offer a sense of sophistication. This style can be achieved using a simple color palette or with bold contrasts, making it versatile for any occasion.
To create swirls:
- Start with a solid base.
- Use a fine brush, like the Fine Detail Nail Art Brush Set, to create swirling lines in a contrasting color. Its precision allows for intricate designs that really pop.
- Consider adding small dots for extra flair; the Nail Art Dotting Tools can help you achieve perfectly round dots effortlessly.
- Seal with a glossy top coat to enhance the swirls.
This design looks beautiful for formal occasions or any time you want to feel extra special!
24. Twinkling Stardust

A playful twist on the celestial theme, twinkling stardust nails incorporate tiny dots and sparkles to create a fun, whimsical effect. To achieve this enchanting look, start with a dark base color to make the design pop.
For the scattered star effect, a dotting tool set is essential; it allows you to create small dots that resemble stars across your nails with precision. Finish off your masterpiece with a coat of Sally Hansen Double Duty™ top coat.
This quick-drying, long-lasting solution ensures your nails stay fresh and sparkly, providing a streak-free shine. To add that magical touch, don’t forget to use some glitter nail polish for those twinkling highlights. This design is perfect for anyone who loves a bit of whimsy!
25. Bright Neon Accents

Neon accents can be a fun way to brighten up your nails while maintaining an elegant look. For this design, start with a nude or white base coat using GELLEN 4-in-1 Nude Illuminating Nail Concealer Base Coat Polish. This polish not only provides a smooth and sheer finish but also strengthens your natural nails, ensuring a solid foundation for your design.
Next, grab a vibrant neon polish, such as ILNP Playlist – Glowing Neon Lime Cream Nail Polish, to create tips, stripes, or dots that offer a striking contrast against the neutral base. The lively hues will definitely help you stand out in any crowd.
Finally, seal your design with Beetles Gel Polish No Wipe Gel Top Coat. This glossy top coat not only enhances the shine of your manicure but also ensures longevity, protecting your nail art from chips and wear. This design is perfect for parties or whenever you want to show off your stylish flair!
Conclusion

Nail art can be a beautiful expression of your style without needing to splurge.
With these 25 classy designs, you can enjoy the luxury look while staying within a budget.
So grab your nail polish and let your creativity shine! Which design are you excited to try first?
Note: We aim to provide accurate product links, but some may occasionally expire or become unavailable. If this happens, please search directly on Amazon for the product or a suitable alternative.
This post contains Amazon affiliate links, meaning I may earn a small commission if you purchase through my links, at no extra cost to you.
Frequently Asked Questions
What are some affordable nail art techniques that can make my nails look expensive?
You don’t need to spend a fortune to achieve a luxurious look! Techniques like gold foil accents or marble designs can elevate your manicure without breaking the bank. For example, using gold foil on a solid color base instantly adds a touch of glamour, while marble nail art can be surprisingly easy with just a few tools at home. Experiment with these styles to see which one fits your vibe!
How can I create DIY nail art designs that are trendy yet classy?
Creating DIY nail art that’s both trendy and classy is all about choosing the right styles. Opt for geometric patterns or pastel ombre designs for a modern twist. You can use nail tape for clean lines in geometric designs, and for ombre, a makeup sponge can help you achieve that smooth gradient effect. Don’t forget to finish with a top coat for that polished look!
What are some classy nail styles that are perfect for special occasions?
For special occasions, consider elegant French twists or delicate lace accents. These styles offer sophistication and can be dressed up or down depending on your outfit. A textured velvet finish can also give your nails a rich, luxurious feel, making them perfect for weddings or formal events. Remember, the key is to choose a design that complements your overall look!
What nail colors and designs are currently trending for classy looks?
Currently, minimalist monochrome styles and glitter gradients are trending for a classy look. Soft, muted colors like blush or sage green are popular choices, as they exude a sense of elegance. Pair these colors with simple designs, like a glitter gradient, to keep things chic yet stylish. Keeping your nail art simple can often yield the most sophisticated results!
How can I maintain my nail art to ensure it lasts longer?
To keep your nail art looking fresh and fabulous, start with a solid base coat and finish with a quality top coat for protection. Avoid exposing your nails to harsh chemicals and wear gloves when doing chores. Also, consider using a cuticle oil to keep your nails and surrounding skin hydrated. Regular touch-ups can help maintain your design, especially if you opt for intricate styles like artistic brush strokes!
Table of Contents